Wednesday, April 29, 2015

Robot Invasion!

Hello Everyone,
Look out--it's a Robot invasion--brought to you by Carmen's Veranda and Lost Coast Designs!  LOL  Check out this super fun new Robot stamp from CV!!  I just love it!   I made two cards using the Robot and Lost Coast Designs' Cityscape (another of my fav's)


Isn't that a fun stamp??!!  Love it!!  More details on my blog, Dreaming and Creating.  See you next time!
Karen McAlpine

Sunday, April 26, 2015

A Happy Painting

Hello Coasties!

Today I have a fun project to share I made for a lesson by Juliette Crane in the Lifebook 2015 course!


This project is on a 9x12 piece of watercolourpaper and I applied several layers of (tissue)paper and acryllic paint before I started drawing the owl ( B.t.w it was my first owl effer so very hard for me)


On the bottom part I did some journalling on the background and above that I used the Party Hat Set as some kind of pink trees.  I like using stamps for something else instead of what they actually are meant to be.


So you can see that Lost Coast Stamps can be very multifunctional too.


Here is some work in progress, at this point I really was thinking of throwing it away, I didn't like it at all :(
 

Thanks for watching and I hope this example gives you a little bit of inspiration if you want to use your stamps in a different way.

xx Esther


Thursday, April 23, 2015

Friends

Hello everyone,

Corrie here,  I have an art journal to share with you today.


I used a gelli print as a base for this. I also used pattern paper, a few scraps of fabric, a doily, some twine and a label made with my Dymo Labeler.

I used the following stamps :
Three sisters
Loopy Calligraphy
Love Dictionary

Thank you for stopping by today ! 

Hope you like it...

Corrie x

Monday, April 20, 2015

Angel in Disguise

Hello sweet Lost Coast friends, Coby here. I played with
this beautiful stamp Angel in Disguise.

I made the background with Distress Ink, on
the little card I first stamped  with Agregate.
The stars and the heart I colored with Tombows.


Friday, April 17, 2015

Vintage Altered Book Card By Bibiana

Hello Dear fans of Lost Coast Designs Stamps:

Here Bibiana....

I made this card using the "Altered Book set" from Lost Coast Designs
to make this vintage looking card with some wear and tear!

front vintage teared altered book

For the background:
I embossed the background with the gears right bottom corner (from a Tim Holtz embossing folder), then sponged the background with several distress inks, finally stamped the flourish swirl

detail vintage teared altered book

The Front:
I used a Spellbinders labels dies to make the book, stamped the "altered book" image, and teared the other image

side view vintage teared altered book


Hope you like this card I enjoyed making it , I really like this set!

Thanks for the visit and the lovely comments
see you for a next crafting project!

you can find me at my blog:
"Stamping with Bibiana"

SUPPLIES

Lost Coast Designs Stamps: Altered Book Set;  flourish:  long swirl

Tuesday, April 14, 2015

Still waiting for Mr. Wright

Hello everybody, Yvonne here with my "spring" project for this months challenge. I really love the stamp with the four old lady's waiting for Mr. Wright....they always make me smile.
Here they are...sitting in the sun...
For the background I used two sprays: lemon zest and sunset orange. I masked the image and used two stencils to make the background more interesting. After that I stamped some butterfly's around the women. I colored the image with distress ink and markers: tumbled glass, salty ocean, tattered rose, squeezed lemonade, spun sugar, shaded lilac and shabby shutters.
With modeling paste and a big stencil I made the word "spring". I colored it with LuminArte silks acrylic glaze pretty peridot. 
For the little details I used a black pencil and a white posca.
Stamps I used:
- Waiting for Mr. Wright
- More bugz

Thanks for stopping by :-)

Saturday, April 11, 2015

EASY All occasion card


Hello Again!! 
Tera here with a fun and easy all occasion card!


Supplies:
Verafine Black ink
hear no evil, see no evil, speak no evil stamp
A2 card base made from tan paper, and map scrapbook paper

Start with your card base and add some scrapbook paper in a matte style so that you have a small boarder. Next stamp your image on some white paper (mine is tan marbled with white) then add a tan boarder behind. Last, put everything together and send to a friend! :) :) :)

hope you all enjoy! Don't forget to play along with our spring themed challenge!!!

Wednesday, April 8, 2015

See No Evil Altered Playing Card

Hi, Nikki here sharing an altered playing card I made featuring the 'see no evil' monkey from the three monkeys stamp. I am actually slowly working my way through a whole pack of cards.
 My background was made first gessoing the playing card and then by drawing some chevrons in pen and then using Arlene's tacky glue I drew inside the lines. When it was all dry (about 2 days later ! LOL), I painted it with green and brown acrylics, then peeled off some of the glue chevrons to reveal the playing card beneath. I used some film strip transparency and fourth dimension background stamp for the ground. The words were typed and printed on my printer. Don't we all wish we could un-see some things ?

Here is a close up of my monkey. He is stamped on white card stock in black versamark, embossed in clear powder and colored with inktense pencils.  I fussy cut him and glued him over my background.
All three monkeys on this stamp are adorable, maybe I will do something else soon with 'speak no evil' and 'hear no evil'. Thanks for stopping by, I hope you were inspired to create :) Nikki x

Monday, April 6, 2015

Challenge #11 : Spring

 Sadly there is no winner for our 'Use some red' challenge as we did not have enough entries.

But there were some fabulous entries - thank you for sharing your gorgeous Lost Coast Designs and Carmen's Veranda creations with us.

And now for our April challenge :

April Challenge #11 : Spring

In the northern hemisphere spring is approaching, so lets embrace that and see some spring themed projects.

Some inspiration from the design team :

Leigh has used Lily from Lost Coast Designs

Nikki has used Rabbit with Flowers from Lost Coast Designs 

Karen has used Bird Square from Carmen's Veranda for both cards :


Coby has used Lost Coast Designs : Flower flourish, More bugz and Travel Quotes

Yvonne has used Waiting for Mr Right and More Bugz from Lost Coast Designs 

Please join us and link up your challenges by 11.55pm PST on 25th of the month.
Before you enter please familiarize yourself with our rules, in particular please remember to use images from either Lost Coast Designs or Carmen's Veranda to be eligible for the monthly prize of $10 to spend in-store.
Cant wait to see what you create :)


Wednesday, April 1, 2015

A Game of Bingo!

Hi everyone! My name is Tarah (aka Miss Thundercat) and this is my first post here. I am excited to be part of this fantastic DT. My focus is on mail art and ATCs so my posts are mostly on how you can incorporate the wonderful Lost Coast Designs and Carmen's Veranda rubber stamps in those type of projects.

Today I would like to share with you this mail art inspired piece which I call "A Game of Bingo!"
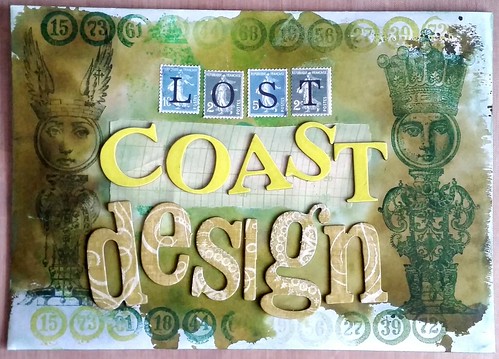
LCD a game of bingo

Stamps used:
Bingo Border
the King and Queen

Other materials:
Distress ink pads peeled paint and shabby shutters
Distress stain Peeled paint
Staz-on olive green ink pad
Kaleidacolor caribbean sea ink pad
green metallic rub ons
Letter's by K's Company and Basic Grey
Alphabet Postage stickers by cavallini and co

First I made background with distress inks which I pressed on my kraft sheet and sprayed with water. Then added a smear of the peeled paint distress stain. I pressed the envelope down on the kraft sheet to get the blot effect then set it aside to dry. I used Staz-On Olive Green to stamp the King and Queen on either side. The kaleidacolor ink pad I used for the bingo border stamp on the top and bottom of the envelope. I added a vintage piece of measurement paper in the middle (that could function as the space to write the address down). Also ripped the edges of that paper slightly and added a bit of metallic green pearl rubs on the edges of the paper and the white parts of the envelope.
LCD a game of bingo 2

Since I have so many letter stickers/chips and stencils, I like to play around with positions and variations before I settle with the permanent design. The 'LOST' letters in faux postage stamps really gives this the complete mail art feel I was looking for so I eventually settled for that.

Hope this inspired you to play around with game and letter pieces.
Thanks for stopping by!